Fibonacci Zone
Fibonacci Zone
THE CONCEPT
The basis of the approach is to compare yesterday’s Close to today’s Open by John Jackson. After many years of research and backtesting, John concluded that yesterday’s Close and today’s Open affected the prices in a significant manner. By establishing a designation or pattern of these two factors, Fibonacci Zone Analysis™ opened a new avenue for statistical analysis of real time markets.
Question about the Zone
1. How often will a specific Fibonacci Zone™ be reached?
2. Which is the highest percentage Resistance Fibonacci Zone™ for today?
3. Which is the highest percentage Support Fibonacci Zone™ for today?
Setting up the Zone
SEE CHART 1A
STEP 1 CREATING THE ZONES
1. Add today’s H + L + C ÷ 3 = Balance Point (BP) = C
A: (H+L+C)/3=BP=C
2. Calculate 50% of today’s range and add it to C = D
A: (H-L)X0.5+C=D
3. Calculate 50% of today’s range and deduct it from C = B
A: C-(H-L)X0.5=B
4. Add the entire day’s range to the BP C = E
A: (H-L)+C=E
5. Deduct the entire day’s range from the BP C = A
A: C-(H-L)=A
We have created 5 price levels which give us 6 Zones. The Zones 2- 3-4-5 have upper and lower boundaries. But, Zones 1 & 6 have not (more on this later).
CHART 1B
STEP 2 ADDING FIBBO SUPPORT/RESISTANCE BANDS 1 & 2
We use the Fibonacci Ratio of .618 and 1.382 of the day’s range to help increase the probability of the Fibonacci Zone Analysis™.
Support Band 1 : Calculate .618 of the day’s range and subtract that from the BP = B1 (Horizontal line). The shaded area between B and B1 = FIBBO SUPPORT BAND 1.
A: C-0.618X(H-L)=B1
Support Band 2 : Calculate 1.382 of the day’s range and subtract that value from the BP = A1 The shaded area between A and A1 = FIBBO SUPPORT BAND 2
A: C-1.382X(H-L)=A1
Resistance Band 1 : Calculate .618 of the day’s range and ADD it to the BP = D1 The shaded area between C and C1 = FIBBO RESISTANCE BAND 1.
A: 0.618X(H-L)+C=C1
Resistance Band 2 : Calculate 1.382 of the day’s range and ADD it to the BP = D1 The shaded area between D and D1 = FIBBO RESISTANCE BAND 2
A: 1.382X(H-L)+C=D1
Chart 1A and 1B
Analyzing the Zone
ZONE REACHED PROBABILITY - CHART A
This is displayed on the bottom line of the Probability Matrix™ as: Reached. This informs you of the percentage probability of a specific Fibonacci Zone being reached, on that day. Naturally, if prices opened in Zone 4, then given a 6-4 combination, prices will always reach Zone 4 (100%).
You can see that Zone 3 will be reached 61% of the time. That means that if you are looking to take action (buy or sell) in Zone 3, then you have a 61% probability to make that trade. But, if you want to trade in Zone 5, then you have a lower probability to make that trade, as the prices reach Zone 5 only 52% of the time.
But, if you want to, say, buy in Zone 1, you have a very small chance of getting that trade off, because prices reach there only 3% of the time. In other words, 97% of the time you will not be able to make that trade in Zone 1. One could define the probabilities for Zone reached. When prices enter into that Zone. In other words, the bar does not have to close in that zone or breach the opposite end of the zone, just enter it.
ZONE RESISTANCE PROBABILITY - CHART B
Shown in the top line of the Probability Matrix™. Here, the highest percentage Resistance occurs in Zone 5 = 78%. This means that if you are looking to sell in Zone 5, prices will not breach the opposite border of the Zone 78% of the time.
The definition is: Zone Resistance probabilities are established only when prices enter into the Zone and do not penetrate the opposite border of that zone.”
ZONE SUPPORT PROBABILITY - CHART C
Looking at a CL6-OP4 designation, you can see that Zone 1, Zone 2 and Zone 3 all show a high percentage Support (over 60%). So, if your plan suggests a “buy” in that area, one should check not only the highest Support Zone probability percentages, but also check to see what are possibilities of getting that trade off.
Zones 1 and 2 are seldom reached, but Zone 3 can be reached some 61% of the time with this specific Zone Designation.
The definition is: Zone Support probabilities are in effect only when prices enter into the Zone and do not cross the opposite border of that Zone. (Zones 1 and 6 are exceptions, as they have no opposite border.)
COMBINED ZONE PROBABILITY - CHART D
One picture shows the balance between Reached, Support, Resistance, and Probabilities. To gain the maximum potential benefit from the Fibonacci Zones™, one should look for combinations that show the highest probability situation for that day. Then combine it with your trading plan. That’s why its called: “High Probability Fibonacci Zone Analysis™”.
Take a look at CHART D, if you are looking to buy and prices Reach Zone 3 (61% of the time), THEN 79% of the time Zone 3 finds support, ie: Zone 3 is defined as prices rallying to close in a higher Zone. But, as you can see, that if prices Reach Zone 5 (52% of the time) then 78% of the time Zone 5 finds resistance, ie: prices will not cross into Zone 6. (So, if trading multiple contracts, perhaps it is time to lighten up.)


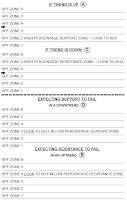
UPTREND
A) We can buy in a High % Support Zone.
B) We can buy in a Low % Resistance Zone.
In case “A” we may expect the High % Support Zone to hold in the Uptrend direction.
In case “B” we may expect the Low % Resistance Zone to fail, as the Trend carries on up.
DOWNTREND
C)We can sell in a High % Resistance Zone.
D)We can sell in a Low % Support Zone.
In case “C” we may expect the High % Resistance Zone to hold as prices proceed down in the Downtrend direction.
In case “D” we may expect the Low % Support Zone to fail, as prices proceed in the Downtrend direction.
POTENTIAL TRADE SELECTION
WHAT PROBABILITIES CAN BE CONSIDERED HIGH OR LOW
Each trader will define his own zone probability as to what is High definition, depending on one’s risk preference and frequency of trading. C
ENTERING TRADES IN HIGH % SUPPORT/RESISTANCE ZONES
In Fibonacci Zones™ of High Probability Support you are buying weakness in price. So, if the trend is up and prices drop into a High % Support Zone, you can look to buy. In Fibonacci Zones™ of High Probability Resistance you are selling strength in price. So, if the trend is down and prices rise to a High % Resistance Zone, you can look to sell.

THE CONCEPT
The basis of the approach is to compare yesterday’s Close to today’s Open by John Jackson. After many years of research and backtesting, John concluded that yesterday’s Close and today’s Open affected the prices in a significant manner. By establishing a designation or pattern of these two factors, Fibonacci Zone Analysis™ opened a new avenue for statistical analysis of real time markets.
Question about the Zone
1. How often will a specific Fibonacci Zone™ be reached?
2. Which is the highest percentage Resistance Fibonacci Zone™ for today?
3. Which is the highest percentage Support Fibonacci Zone™ for today?
Setting up the Zone
SEE CHART 1A
STEP 1 CREATING THE ZONES
1. Add today’s H + L + C ÷ 3 = Balance Point (BP) = C
A: (H+L+C)/3=BP=C
2. Calculate 50% of today’s range and add it to C = D
A: (H-L)X0.5+C=D
3. Calculate 50% of today’s range and deduct it from C = B
A: C-(H-L)X0.5=B
4. Add the entire day’s range to the BP C = E
A: (H-L)+C=E
5. Deduct the entire day’s range from the BP C = A
A: C-(H-L)=A
We have created 5 price levels which give us 6 Zones. The Zones 2- 3-4-5 have upper and lower boundaries. But, Zones 1 & 6 have not (more on this later).
CHART 1B
STEP 2 ADDING FIBBO SUPPORT/RESISTANCE BANDS 1 & 2
We use the Fibonacci Ratio of .618 and 1.382 of the day’s range to help increase the probability of the Fibonacci Zone Analysis™.
Support Band 1 : Calculate .618 of the day’s range and subtract that from the BP = B1 (Horizontal line). The shaded area between B and B1 = FIBBO SUPPORT BAND 1.
A: C-0.618X(H-L)=B1
Support Band 2 : Calculate 1.382 of the day’s range and subtract that value from the BP = A1 The shaded area between A and A1 = FIBBO SUPPORT BAND 2
A: C-1.382X(H-L)=A1
Resistance Band 1 : Calculate .618 of the day’s range and ADD it to the BP = D1 The shaded area between C and C1 = FIBBO RESISTANCE BAND 1.
A: 0.618X(H-L)+C=C1
Resistance Band 2 : Calculate 1.382 of the day’s range and ADD it to the BP = D1 The shaded area between D and D1 = FIBBO RESISTANCE BAND 2
A: 1.382X(H-L)+C=D1
Chart 1A and 1B
Analyzing the Zone
ZONE REACHED PROBABILITY - CHART A
This is displayed on the bottom line of the Probability Matrix™ as: Reached. This informs you of the percentage probability of a specific Fibonacci Zone being reached, on that day. Naturally, if prices opened in Zone 4, then given a 6-4 combination, prices will always reach Zone 4 (100%).
You can see that Zone 3 will be reached 61% of the time. That means that if you are looking to take action (buy or sell) in Zone 3, then you have a 61% probability to make that trade. But, if you want to trade in Zone 5, then you have a lower probability to make that trade, as the prices reach Zone 5 only 52% of the time.
But, if you want to, say, buy in Zone 1, you have a very small chance of getting that trade off, because prices reach there only 3% of the time. In other words, 97% of the time you will not be able to make that trade in Zone 1. One could define the probabilities for Zone reached. When prices enter into that Zone. In other words, the bar does not have to close in that zone or breach the opposite end of the zone, just enter it.
ZONE RESISTANCE PROBABILITY - CHART B
Shown in the top line of the Probability Matrix™. Here, the highest percentage Resistance occurs in Zone 5 = 78%. This means that if you are looking to sell in Zone 5, prices will not breach the opposite border of the Zone 78% of the time.
The definition is: Zone Resistance probabilities are established only when prices enter into the Zone and do not penetrate the opposite border of that zone.”
ZONE SUPPORT PROBABILITY - CHART C
Looking at a CL6-OP4 designation, you can see that Zone 1, Zone 2 and Zone 3 all show a high percentage Support (over 60%). So, if your plan suggests a “buy” in that area, one should check not only the highest Support Zone probability percentages, but also check to see what are possibilities of getting that trade off.
Zones 1 and 2 are seldom reached, but Zone 3 can be reached some 61% of the time with this specific Zone Designation.
The definition is: Zone Support probabilities are in effect only when prices enter into the Zone and do not cross the opposite border of that Zone. (Zones 1 and 6 are exceptions, as they have no opposite border.)
COMBINED ZONE PROBABILITY - CHART D
One picture shows the balance between Reached, Support, Resistance, and Probabilities. To gain the maximum potential benefit from the Fibonacci Zones™, one should look for combinations that show the highest probability situation for that day. Then combine it with your trading plan. That’s why its called: “High Probability Fibonacci Zone Analysis™”.
Take a look at CHART D, if you are looking to buy and prices Reach Zone 3 (61% of the time), THEN 79% of the time Zone 3 finds support, ie: Zone 3 is defined as prices rallying to close in a higher Zone. But, as you can see, that if prices Reach Zone 5 (52% of the time) then 78% of the time Zone 5 finds resistance, ie: prices will not cross into Zone 6. (So, if trading multiple contracts, perhaps it is time to lighten up.)


UPTREND
A) We can buy in a High % Support Zone.
B) We can buy in a Low % Resistance Zone.
In case “A” we may expect the High % Support Zone to hold in the Uptrend direction.
In case “B” we may expect the Low % Resistance Zone to fail, as the Trend carries on up.
DOWNTREND
C)We can sell in a High % Resistance Zone.
D)We can sell in a Low % Support Zone.
In case “C” we may expect the High % Resistance Zone to hold as prices proceed down in the Downtrend direction.
In case “D” we may expect the Low % Support Zone to fail, as prices proceed in the Downtrend direction.
POTENTIAL TRADE SELECTION
WHAT PROBABILITIES CAN BE CONSIDERED HIGH OR LOW
Each trader will define his own zone probability as to what is High definition, depending on one’s risk preference and frequency of trading. C
- Conservative traders may prefer to wait for probabilities above 70% (or Below 30% if expecting the Zone to fail).
- Aggressive traders may look for trades with lower probabilities (Above 60% or Below 40%).
ENTERING TRADES IN HIGH % SUPPORT/RESISTANCE ZONES
In Fibonacci Zones™ of High Probability Support you are buying weakness in price. So, if the trend is up and prices drop into a High % Support Zone, you can look to buy. In Fibonacci Zones™ of High Probability Resistance you are selling strength in price. So, if the trend is down and prices rise to a High % Resistance Zone, you can look to sell.


Comments
Post a Comment